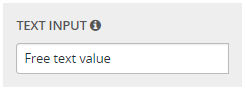
文本字段
- “inputType”: “文本输入”
- 描述:一个简单的自由文本字段
- 例:
“text_input”: {
    “title”: “文本输入”,
    “inputType”: “textinput”,
    “value”: “自由文本值”,
    “info”: “自由文本字段”
}
文本区域
- “inputType”: “文本区域”
- 说明:用于较长文本输入的文本框。
- 例:
“textarea_input”: {
    “title”: “Text Area”,
    “inputType”: “textarea”,
    “value”: “Check this out”,
    “info”: “现在你的文章空间增加了 20%。

多个文本字段
- “inputType”: “多文本输入”
- 说明:用户可以添加多个具有单独值的输入文本字段。用于
maxValue定义可以输入的最大值数。 - 例:
- 说明:用户可以添加多个具有单独值的输入文本字段。用于
“multiple_text_input”: {
    “title”: “多个文本输入”,
    “inputType”: “多个文本输入”,
    “value”: [
        {
            “element”: “Hello”
        },
        {
            “element”: “世界”
        }
    ],
    “maxValue”: 4,
    “info”: “最多允许 4 个值”
}

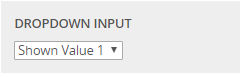
下拉字段
- “inputType”: “下拉输入”
- 说明:包含可选选项的下拉字段。用作
elements特定属性,将所需值添加为表示下拉选项的匿名 JSO 元素。每个元素必须包含名称和值。 - 例:
- 说明:包含可选选项的下拉字段。用作
“bluetooth_connect_mode”: {
    “title”: “连接模式”,
    “inputType”: “dropdown-input”,
    “value”: “search”,
    “elements”: [
        {
            “name”: “搜索和查找”,
            “value”: “搜索”
        },
        {
            “name”: “扫描代码”,
            “value”: “scan”
        }
    ],
    “showIfComputed“: true,
    ”info“: ”'搜索和查找'将发现所有可用的设备并根据类型对其进行过滤。“代码扫描”允许您扫描设备的MAC地址或名称。
多个下拉字段
- “inputType”: “多下拉列表输入”
- 描述:使用多级下拉输入字段,用户可以添加同一下拉字段的多个实例,从而为他们的订单选择多个值。具体属性包括:
maxValue定义可选取的最大值数elements:添加表示下拉选项的匿名 JSON 元素(每个元素必须包含名称和值)
- 例:
- 描述:使用多级下拉输入字段,用户可以添加同一下拉字段的多个实例,从而为他们的订单选择多个值。具体属性包括:
“multiple_dropdown_input”: {
            “title”: “多个下拉列表输入”,
            “inputType”: “multiple-dropdown-input”,
            “value”: [
                {
                    “name”: “显示值”
                },
                {
                     “name”: “显示值 2”
                },
            ],
            “elements”: [
                {
                    “name”: “显示值”
                },
                {
                    “name”: “显示值 2“
                },
                {
                    ”name“: ”显示值 3“
                }
            ],
            ”maxValue“: 2
        }

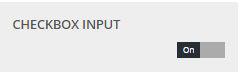
复选框
- “inputType”: “复选框输入”
- 描述:布尔切换输入
- 例:
“checkbox_input”: {
    “title”: “复选框输入”,
    “inputType”: “复选框输入”,
    “value”: “true”
}
号码范围
- “inputType”: “范围”
- 描述:数字范围输入
- 例:
“range”: {
    “title”: “读取范围”,
    “inputType”: “range”,
    “rangeMin”: “1”,
    “rangeMax”: “20”,“
    value”: 15
}

文件上传
- “inputType”: “文件上传”
- 描述:允许用户上传图像文件。
- 例:
“sensor_type”: {
    “inputType”: “file-upload”,
    “title”: “Icon”,
    'accept“: ”image/png“,
    'multiple”: false,“
    showIf”: “root.Value_1.sensor_shown.value“,
    ”value“: ”xai:/wf-editor/2c639f9c-a3d5-4830-9e55-092fe98d92a4/component_sensor_1563203048508_image001.png?version=1“,”
    showIfComputed“: true
}

拾色器
- “inputType”: “颜色输入”
- 说明:用于选择颜色的输入。用户可以定义十六进制值列表以供选择或使用完整的颜色选择器。
- 例:
“color”: {
    “inputType”: “color-input”,
    “title”: “拾色器”,
    “list”: [
        “#fcba03”,
        “#1d6280”
    ],
    “showIfComputed”: true,“
    value”: “#fcba03”
}

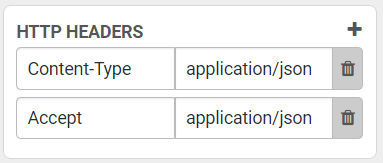
地图输入
- “inputType”: “地图输入”
- 描述:一个文本输入字段,用于关联键和值,就像在地图中一样。默认情况下,文本字段中的占位符将为“Key”和“Value”。可以更改它们,如以下示例所示。
- 例:
“headers”: {
    “title”: “Http Headers”,
    “inputType”: “map-input”,
    “placeholder”: {
        “key”: “Header Name”,
        “value”: “Header Value”
    },
    “value”: [
        {
            “key”: “Content-Type”,
            “value”: “application/json”
        },
        {
            “key”: “Accept”,
            'value“: ”application/json“
        }
    ]
}
要将地图输入数据保存到实际的 Javascript 地图中,请遵循以下方法:
<setvar id=“save_headers”>
    <context_of>workflow</context_of>
    <context_update>
        <param name=“headers” type=“object”><![CDATA[?{ var headers = { §{#each configuration.headers.value}§'§{key}§': '§{value}§',§{/each}§ }; 标头 }?]]></param>
    </context_update>
</setvar>
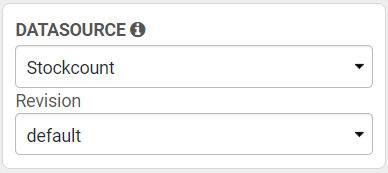
数据源输入
- “inputType”: “数据源选择”
- 说明:一个下拉字段,可让您从上传到 Frontline Command Center 的所有数据源中进行选择。这允许您将组件与不同的数据源动态关联。
- 例:
“datasource”: {
            “noOptionsInfo”: “未找到数据源!”,
            “title”: “数据源”,
            “inputType”: “datasource-selection”,
            “revisionSelection”: true,
            “required”: true,
            “info”: “选择要使用的数据源”,
            “value”: null
        }
此配置通常与数据源操作结合使用。例如,您可以将当前数据源任务的第一行保存到上下文中,根据需要操作该行(提取或更改数据),然后将更改的行保存回数据源任务。
将第一行([0] 可以替换为索引变量)保存到上下文中。包含行的字符串版本的附加变量便于调试,但可以省略。
<setvar id=“row_to_context”>
  <context_of>root</context_of>
  <context_update>
    <param name=“current_row” type=“object”>?{ context.ds_§{ replace validation.datasource.value.id '-' ''  }§[0] }?</param>
    <param name=“current_row_to_string” type=“string”><![CDATA[?{JSON.stringify(context.current_row)}?]]></param>
  </context_update>
</setvar>
提取数据(例如,在UI中显示数据):
<setvar id=“get_row_data”>
    <context_of>workflow</context_of>
    <context_update>
       <param name=“material” type=“string”><![CDATA[ ?{ context.current_row.payload[“材质名称”].value }? ]]></param>
    </context_update>
</setvar>
更改数据源中存在的数据列:
<setvar id=“set_counts”>
    <context_of>root</context_of>
    <context_update>
        <param name=“current_row” type=“object”><![CDATA[ ?{
            context.current_row.payload[“结果”].value = context.outcome;
            context.current_row.payload[“分配给用户”].value = appcontext.client.user.id;
            context.current_row.payload[“分配名称”].value = appcontext.task.name;
            context.current_row.payload[“完成日期”].value = new Date(Date.now()).toUTCString();
            context.current_row.status = '完成';
            context.current_row;
        }?]]></param>
        <参数名称=“current_row_to_string”type=“string”><![CDATA[?{JSON.stringify(context.current_row)}?]]></param>
    </context_update>
</setvar>
将更改的行传播回数据源任务:
<update_datasource_task id=“update_ds_with_row”>
    <参数名称=“datasource_task_id” type=“string”>?{context.ds_§{ 替换 validation.datasource.value.id '-' '' }§_task.id}?</param>
    <param name=“rows”>#{current_row}</param>
    <param name=“payload_variable_name”>ds_§{ 替换 validation.datasource.value.id '-' ''  }§</param>
</update_datasource_task>